Monday, 3 February 2014

A quite personal post: my weight loss journey so far

13 kilos, just over 2 stone.

Like many women, I have a struggle with my weight. Actually, I should say like 99% of the women in the western world, as no one ever seems to be happy with theirs even when it is pretty perfect. 
I remember feeling fat since my preteens even though I was rather skinny until I turned 20, but with my height ( I am just over 5 ft tall! Tiny!) and my bone structure (proportionally big) I was never happy.
Since my early twenties I started to put weight, not too much and gradually. Then when I hit 28 I started to put a lot of weight very fast. I knew that, I wasn't blind or oblivious to the fact, but I also did not care much. I have never been someone with a strong will power, I knew I needed to loose weight but could not actually make myself do it. I hate exercise and I love my fatty and unhealthy food, and tasty food has always made me happy.

At the end of 2011 I started to feel unwell, getting extremely tired, with excruciating joint pains... and my weight kept piling on. My GP diagnosed me with some mild hormonal issues and sent me on my merry way, but all my health issues kept worsening, so much so that I started to question if I could do my full time job at the time at Sizzix. Finally, in late 2012 I felt had to leave the full time dream job at Sizzix because I personally felt my body was letting me down. It was probably the hardest decision I had to take professionally as I loved working for the European division of Sizzix, from my my boss, to my wonderful colleagues - specially Pete Hughes - to the products... It really was a dream job for me. But I needed to get better and not being a good multitasker, I knew I wanted to concentrate in getting better.

And that was what 2013 was all about. It took me over a year and a half to get my GP to refer me to the specialist, an endocrinologist. But I am so glad I persisted on my quest because a couple of visits and tests after, the endocrinologist had diagnosed me with some strong deficiencies and further mild hormonal imbalances that have no serious consequences but that can be monitored and helped a bit. The main way to help them is to loose weight.

At the end of September 2012, the specialist gave a simple system to diet, exercise rules (minimum 2 hrs of cardio a week), and periodic check ups in which my weight and blood levels would be checked.

The weight started to come off. And today I have reached my initial weight loss goal which looked so far away and impossible to reach when I started this journey.

13 kilos, just over 2 stone.

Later I am going to post about the five reasons why I think I have succeeded in reaching my weight loss target.

My friends and family think I should be very proud of myself, and in a way, I am. But it has been very hard, and still is, and it will be always hard to make those healthy choices I will have to make everyday.


13 kilos, just over 2 stone.


Ps. I am still part of the Sizzix team on a freelance basis, I love the company and people so very much and they have been awesome to me. And I am happy to say that there are more projects with them in the pipeline! I just couldn't do it full time and they were very understanding and supporting.

Saturday, 1 February 2014

Adhesives 101

Some people in the craft industry know of my obsessive love for adhesives, which is surprising for some and understanding for others. Last count, I had over eighty different types of adhesives in my studio. In many of my posts in this or other blogs I made references on what it will be the best glue for the project, but I rarely elaborate on why or on which are my favourite brands and why.

Well, today I decided to put that right and start posting in 2014 going through one of the most important elements of papercrafting in my opinion: my favourite adhesives.

(Click on the images for direct link to either manufacturers sites or shops that stock it)

The first thing we need to discuss is Hold and Bond:
  • Grab - or instant hold - refers to the ability of the glue to grab the items and it is graded by fastness, how quickly the glue attaches the items together. Basically, short term.

  • Bond is how strong and durable the attachment is going to be. Basically, long term.
Some adhesives have a strong  grab but long term - could be days, months or years - will become unattached due to a lack of bond.

Most of the following products have no-brand alternatives, while they may be cheaper they will also be less consistent in their quality. But I don't recommend that, would you like the recipient of your card to have to assemble the elements of it upon arrival? I dont, that is why I like to use the better quality adhesives.

DRY ADHESIVES

They are mess free, easy to use, offer instant grab, but not strong bond even the strongest of tapes will always be bellow the wet glues in long term bond. However, for paper crafting 90% of the time they are strong enough and that fast grab action means makes everything much easier.

Stix2 Foam Pads. We all use foam pads, but like in almost everything else, there are qualities. I don't use any other foam pads, these are the best - I know I have tried 99.99% of the rest. Stix2 are super quality and they come in all sorts of sizes and thicknesses. I have a little post beside my front door saying that the bell does not ring, it is hold by a Stix2 pad, it has been there for over 3 years.

Tape pen. Instead of double sided tape, I use tape pens which are much dater to use and create less mess (backing). Easy to store, easy to use, perfect to attach ribbon to card! I use primarily the Stix2 ones, but I also use other brands.
Stix2 Glue Dots. Again I have used many brands, and seem to like the Stix2 the best, specially the smaller ones which from other manufacturers don't seem to work, but from Stix2 always do. I go for the value box.

Stix2 Double Sided Fingerlift Tape, in a variety of widths. It is the most economical of all types and hence many people choice. I like the fingerlift one because makes the whole removal of backing so much easier. 

Stix2 Ultra Clear Tape - in several widths. The strongest double sided tape ever! Heat resistant ideal for embossing. High tack, instant, clear adhesive. There are a multitude of uses and I try to keep a variety of widths in my studio. 
Stix2 Double Sided A4 Adhesive Sheets. Perfect for die cutting and many other things including guilding, glitters... They are clear so there are a lot of technique that work really well with acetate.

3M Scotch Removable Tape. I have been using this tape since 2003. I always make sure I have one extra. It is the only low tack tape that I trust to secure dies in place when I die cut, the only one that has never rip my paper but at the same time maintained temporarily the item in place.

WET ADHESIVES

Many crafters have a difficult relationship with wet glues, I certainly did for many years. It is challenging working with paper and a wet medium. Wrinkles, bubbles, spills... But use the right wet glue, right applicator and right amount - less is more - and the bond you will get with wet glue will be the best and will remained glued the longest, which is very important when spending time and effort making projects!

Cosmic Shimmer Acrylic Glue. I have been a late convert to this glue, but since I bought it about a year ago, I haven't used any other wet white glue for papercrafting. It dries clear, grabs really quickly and has a very strong bond for a multitude of materials. I use one of the fine tips on the bottle (dont even bother to decant the glue) and works wonders. Remember less is more when it comes to wet glues.

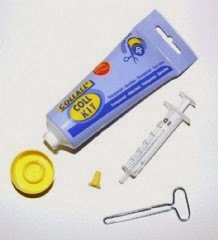
Collall Glue Gel Kit - with Syringe and Dispensing Key. I use it to add height to elements which would not be glued using a foam pad. I prefer this brand to the other well known one because I find that the grabbing power is faster and dries more clear.

Ranger  Studio MultiMedium and Glue and Seal in matte. They are slightly different but I use them both for collage and sealing. They are something I don't use everyday, but that I like to have at hand as they are very good for mixed media projects. (Check Shari Carrol's explanation of mediums, Mod Podge here.)


Tear Mender. A fantastic instant fabric and leather adhesive. Water-proof, permanent, quick drying and flexible. The only drawback is the fact that smells pretty rotten.

OTHER


Cold Melt Glue Gun. So useful for Home Decor and attaching difficult materials that require instant bonding. I prefer cold melt for a variety of reasons, non the least because being myself a clumsy person I rather not burn myself. The trade off is slightly less strong hold but the difference is minimal for the type of projects I do.


Craft Mount Spray Adhesive. The strongest, more reliable spray adhesive I have tried. It comes in two sizes, although the larger one is better value I tend to buy the smaller 200ml size, easier to handle and still lasts a long time. I use it to attach material to card, paper to thicker card, mountboard... specially hen I have to die cut those combinations afterwards.


For archival projects I will use Photo Mount - which is more expensive - and for resticking cutting machine mats I use the Re Mount (Green) which is repositionable.


Heat'n Bond - Lite or Ultra. I am no sewing expert but I love the effect of material on my papercraft and Home Decor projects, and the one products that makes it much easy is this one. Unlike most fabric fusibles, these are solid sheets of heat reactive glue, perfect to die cut with minimal shredding (like one or two) as well as to join two fabrics together. I use mostly the Ultra one (Red) as I rarely sew, but when I intend to I use the Lite version (Purple). It also comes in different sizes, by the metre and packs, so it is easy to buy a tester.

Well done if you have reach this point. Remember, there is no perfect glue, just a variety that will work well for you and your project. These are just my favourites.


Monday, 16 December 2013

I am no multi tasker

I haven't been very good at blogging lately. I dont even have the "I have too much work going on" excuse either. I just been focused on other things, mainly family and loosing weight.

Those who have known me for years will know that I had put on weight, not much in real terms but as a roughly 5' 1/2" woman - yes, I am that short - it was quite considerable. So the doctor ordered me to loose weight. He gave me clear instructions and with a diet of 1000 calories a day and a couple of exercise sessions a week, I have been loosing some weight, but oh boy, has it been distracting!

As I am no multi tasker, the focus has been on that and on the family, visiting them abroad and having my uncle and cousin over for a few days.


Between those two things and articles for Cardmaking & Papercraft - I did the 10 ideas for handmade gifts issue 125 as well as for other issues before and after, well, lets just say the blog and my christmas cards have been neglected.


But on Saturday I got a lovely email from Christine Ashton with photos of her Christmas Tags made with my Leafy Tree dies for Sizzix. That really brought as smile to my face and made me want to craft Christmas again. Thanks, Christine!

In the meantime, I will leave you with my Christmas decor. Very simple but all lovingly handmade using my dies for Sizzix EU.


Happy Christmas!

Friday, 8 November 2013

A quick one

November is one of my least favourite months as the days become really short, but on the other and usually is a busy month so I cant dwell on it too much.


Just sharing this super quick card I made using left overs that I had on the table.


I used:

Sizzix, Flower, Star to die cut the whole flower,
Sizzix, Square Framelits to create the aperture,
Sizzix, Circles #2
Personal Impressions Clear stamps, Essential Christmas PPCSA6005


Which reminds me, I should really make a move on my Christmas cards.

Tuesday, 5 November 2013

Thursday, 17 October 2013

More Pan Pastels Metallics

I usually fetch my Pan Pastels to add colour, quick and easy, to my embossed card. But another lovely quick and easy effect is to stamp and apply the Pan pastels. This is even better using the new metallics pastels.


For this one I am using the snowflakes stamp and framelits dies set, white smooth card and inks.


The classic way of stamping and pastels is using Versamark or any sticky clear ink pad. After the clear ink has dried, gently apply the Pan Pastels with a Sofft sponge tool with dabbing motions.


To add more colour, I inked the stamp using Versafine ink pad. I always rotate the stamp while inking this allows me to get a better impression.


If I don't rotate the inkpad the ink will be a bit uneven, as shown on the top snowflake. Then I placed the snowflake die and secure it in place with low tack tape.


Once die cut keep the die cut in place and apply the metallic pan pastel. As you can see the metallic effect almost all over, except for a white edge all around.


Here you can see all the different effects. Clockwise from the left, plain Versafine Deep Lagoon; Versafine with Metallic Pan Pastels and then die cut; Versamark with Metallic Pan Pastels and then die cut; and Versafine, die cut and then Metallic Pan Pastels. Slightly different effects!

Saturday, 12 October 2013

Pan Pastels love


I love Pan Pastels since the day one of them landed on my hands. I have quite a few of them. But there were a few new ones that I didn't have till this morning:


And there they are - thanks to Nikky Hall and Pan Pastel UK. All six new luscious gorgeous metallic colors. Top left: light gold, silver, copper, pewter, bronze and rich gold.


 So, of course I had to test them with one of my Textured Impressions Embossing folders, the Snowflakes one. First, I applied the blue colours using a few Pan pastels, blending them well. Then, I applied two metallic colours, the silver and the pewter.


They give this gorgeous metallic/pearlescent shimmer through out blending them nicely with the colours underneath.
They are more subtle than I expected, but I love that about them, it means that I can do more with them, I can mix them up with more colours and produce different effects. I am in love.

I am so glad I got my hands on them!
Related Posts Plugin for WordPress, Blogger...