Monday 16 December 2013

I am no multi tasker

I haven't been very good at blogging lately. I dont even have the "I have too much work going on" excuse either. I just been focused on other things, mainly family and loosing weight.

Those who have known me for years will know that I had put on weight, not much in real terms but as a roughly 5' 1/2" woman - yes, I am that short - it was quite considerable. So the doctor ordered me to loose weight. He gave me clear instructions and with a diet of 1000 calories a day and a couple of exercise sessions a week, I have been loosing some weight, but oh boy, has it been distracting!

As I am no multi tasker, the focus has been on that and on the family, visiting them abroad and having my uncle and cousin over for a few days.


Between those two things and articles for Cardmaking & Papercraft - I did the 10 ideas for handmade gifts issue 125 as well as for other issues before and after, well, lets just say the blog and my christmas cards have been neglected.


But on Saturday I got a lovely email from Christine Ashton with photos of her Christmas Tags made with my Leafy Tree dies for Sizzix. That really brought as smile to my face and made me want to craft Christmas again. Thanks, Christine!

In the meantime, I will leave you with my Christmas decor. Very simple but all lovingly handmade using my dies for Sizzix EU.


Happy Christmas!

Friday 8 November 2013

A quick one

November is one of my least favourite months as the days become really short, but on the other and usually is a busy month so I cant dwell on it too much.


Just sharing this super quick card I made using left overs that I had on the table.


I used:

Sizzix, Flower, Star to die cut the whole flower,
Sizzix, Square Framelits to create the aperture,
Sizzix, Circles #2
Personal Impressions Clear stamps, Essential Christmas PPCSA6005


Which reminds me, I should really make a move on my Christmas cards.

Tuesday 5 November 2013

Thursday 17 October 2013

More Pan Pastels Metallics

I usually fetch my Pan Pastels to add colour, quick and easy, to my embossed card. But another lovely quick and easy effect is to stamp and apply the Pan pastels. This is even better using the new metallics pastels.


For this one I am using the snowflakes stamp and framelits dies set, white smooth card and inks.


The classic way of stamping and pastels is using Versamark or any sticky clear ink pad. After the clear ink has dried, gently apply the Pan Pastels with a Sofft sponge tool with dabbing motions.


To add more colour, I inked the stamp using Versafine ink pad. I always rotate the stamp while inking this allows me to get a better impression.


If I don't rotate the inkpad the ink will be a bit uneven, as shown on the top snowflake. Then I placed the snowflake die and secure it in place with low tack tape.


Once die cut keep the die cut in place and apply the metallic pan pastel. As you can see the metallic effect almost all over, except for a white edge all around.


Here you can see all the different effects. Clockwise from the left, plain Versafine Deep Lagoon; Versafine with Metallic Pan Pastels and then die cut; Versamark with Metallic Pan Pastels and then die cut; and Versafine, die cut and then Metallic Pan Pastels. Slightly different effects!

Saturday 12 October 2013

Pan Pastels love


I love Pan Pastels since the day one of them landed on my hands. I have quite a few of them. But there were a few new ones that I didn't have till this morning:


And there they are - thanks to Nikky Hall and Pan Pastel UK. All six new luscious gorgeous metallic colors. Top left: light gold, silver, copper, pewter, bronze and rich gold.


 So, of course I had to test them with one of my Textured Impressions Embossing folders, the Snowflakes one. First, I applied the blue colours using a few Pan pastels, blending them well. Then, I applied two metallic colours, the silver and the pewter.


They give this gorgeous metallic/pearlescent shimmer through out blending them nicely with the colours underneath.
They are more subtle than I expected, but I love that about them, it means that I can do more with them, I can mix them up with more colours and produce different effects. I am in love.

I am so glad I got my hands on them!

Wednesday 9 October 2013

A quick crafty storage post


I love tins. I collect them, meaning that I keep every single tin that arrives to this house containing food, presents... I cant throw any away, At most I give them away to friends. I needed one the other day so I ventured into my tin basket (above, a massive one) and I found one that was a watch box and still had the foam with the cylindrical cut.

Me encantan las latas. Las colecciono, lo que significa que me quedo cada lata que llega a esta casa. Nunca las tiro, a lo mĂ¡s que he llegado es a dĂ¡rselas a amigos. 
El otro día necesitaba una, así que busqué en mi cesta de latas (arriba, es enorme!) y encontré una caja de reloj que todavía tenía la espuma con el corte cilíndrico.


And quickly I found a way to use. To keep my glues upside down while I am working - I don't keep them like that overnight as the foam would loose its shape after a while.

Y rĂ¡pidamente encontrĂ© una manera de utilizarla: mantener los pegamentos boca abajo mientras trabajo - no los guardo asi por la noche porque la espuma perderĂ­a su forma despuĂ©s de un tiempo.


Added bonus, the foam is perfect to keep in place all those little needle tips and the tin holds nicely the magnets which I use often for many different techniques.
I love storage, specially if it is free!

Un valor añadido, la espuma es perfecta para mantener en su lugar todas esas pequeñas las agujas y la lata mantiene muy bien los imanes que a menudo utilizo para muchas técnicas diferentes.
Me encanta el almacenamiento, especialmente si es gratis!

Tuesday 8 October 2013

Blog Candy: the winners

Thank you so much to everyone that participated! I am so happy after so many comments, follows... Thank you for your ever so kind words. They made my day every single one of them.
Here you have the lucky random winners:

Muchas gracias a todos los que habéis participado! Estoy super feliz, tantos comentarios, follows, me gusta ... Gracias a todos por vuestra amables comentarios. Me han alegrado el dia todos y cada uno de ellos.
AquĂ­ teneis los afortunados ganadores:


Set 1 - Noel - Blog Lovin: Marta de Mi Scrap Lab


Set 2 - Leafy Trees - Pinterest: Louise @ My May Sunshine


Set 3 - Home - Twitter: Katherine Brooks Crafty_Kath


Set 4 - Snowflakes - Facebook: Juani Castillo Alcaide


One extra mystery blog candy - not fromWinter Moments but die sets and two sets of my clear stamps - Comments: Cinnamon Sally 


I have sent you all emails but if you haven't received it yet, email me before Friday the 11th of October: paulabmpascual[@]gmail.com (without the brackets!).

Monday 7 October 2013

Blog Candy! the whole Winter Moments Collection!

This post will be at the top of the blog until the 7th of october.
Please scroll down for more recent entries. Thank you!

- He añadido en la columna de la derecha Google Translate, para que podais traducir toda la pagina de una vez, ya que tardaba demasiado en traducirlo personalmente. ---------------------------------------------------------------------------------------------------->


Today it's a very exciting day. For the first time ever, I am doing blog candy! 
Many times I have though about doing one but never found the right time and energy to do so. But I have been given a full Winter Moments collection - yes all of the dies, embossing folders and stamps!
I like to increase chances of crafters getting their hands on the dies, so I have split the collection of dies in four lots:


Set 1 - Noel


Set 2 - Leafy Trees


Set 3 - Home


Set 4 - Snowflakes

However, you can still win them all fourteen dies if you do all four things listed bellow! 


Here is how, if you do one of the following you will eligible to win one of the blog candy sets, but if you do all four things bellow, you will be eligible all four prizes! 


Like me on Facebook (not the personal Facebook, but the fan page!) www.facebook.com/paulapascualdesigns


Follow me on Twitter! 
www.twitter.com/paulabmpascual


Follow me on BlogLovin!


On the day of the draw, Tuesday the 8th of October, the four Winter Moments sets will be randomly old school selected for each category, so there is no way of knowing which one is the blog candy for Twitter followers, Pinterest... 

If you already follow me on all four mediums, you already are eligible for all of those!

But wait, there is more, on top of that, I have one extra mystery blog candy - not from Winter Moments but die sets and two sets of my clear stamps -you be come eligible for the draw if you leave a comment on this very post! (Comments are moderated only because I get spam, but as long as they are not spam ALL comments will be published!)

So, actually, five prizes in total!

And, while the collection is exclusive to European shops as per Sizzix norms, this competition is open to anyone anywhere! This may be the only chance to get these products for some.

Good Luck!
Mucha Suerte!


Terms and Conditions:

The competition will end on Monday the 7th of October at 23:59. 
The winners will be announced on this blog on Wednesday the 9th of October.
If you are a winner, you will need to email me within two days with your postal address. 
Parcels to be sent out on Saturday 12th of October. 
One comment per person. As I need to review them, don't worry if you press twice or you don't see immediately.

Wednesday 2 October 2013

Vintage box using Sizzix dies and silicone molds


Even the most graphic of embossing folders can be used for a distress and vintage look.

I wanted to create something different using the clean and graphic dies of the Winter Moments collection. I die cut one of the Sizzix box dies which is a mini pizza box for the Big Shot Pro machine. I embossed the top using the Sizzix Textured Winter Snowflake Impressions and then assembled the box.

I painted with acrylic paints (blues and greens) and then added layers of Treasure gold in different colours: gold, Onxyte, olive green.
I made all the embellishments using the silicone moulds that Marion Emberson from Sugar and Spice sells. They are made out of Wow Melt it embossing powder and then painted with the Treasure Gold waxes.

I finally coloured the lace with Distress Stains and glue them all to the box.


It is a rather different look for me, isnt it?

Monday 30 September 2013

A weekend demonstrating Sizzix dies and embossing folders at The Glitter Pot

He añadido en la columna de la derecha el Google Translate (justo debajo de la imagen de Crafty Storage), para que podais traducir toda la pagina de una vez, ya que tardaba demasiado en traducirlo personalmente. 

Last Saturday and Sunday I demonstrated my new Sizzix dies from the Winter collection.
As usual, I had a blast. I honestly wish I could demo more! I love it sooo much. Seeing old friends, meeting new ones, charing the knowledge of die cutting... I am so lucky that I get to be able to do this.
It felt busier than ever and I could feel the excitement of crafting was back on, something I think has been lacking all over the country in the last year and a half. So glad it is back!


Apologies for the bad quality of the photos. I forgot my camera so the phone had to do!

You will see many projects on display that have been featured on my posts both on this blog or on the ones I contribute monthly, Scrapbooking with Tubo or Sizzix EU.


I brought all my dies, from my Everyday collection, Fresh Moments, Big Shot Starter Kit or the latest Winter Moments.


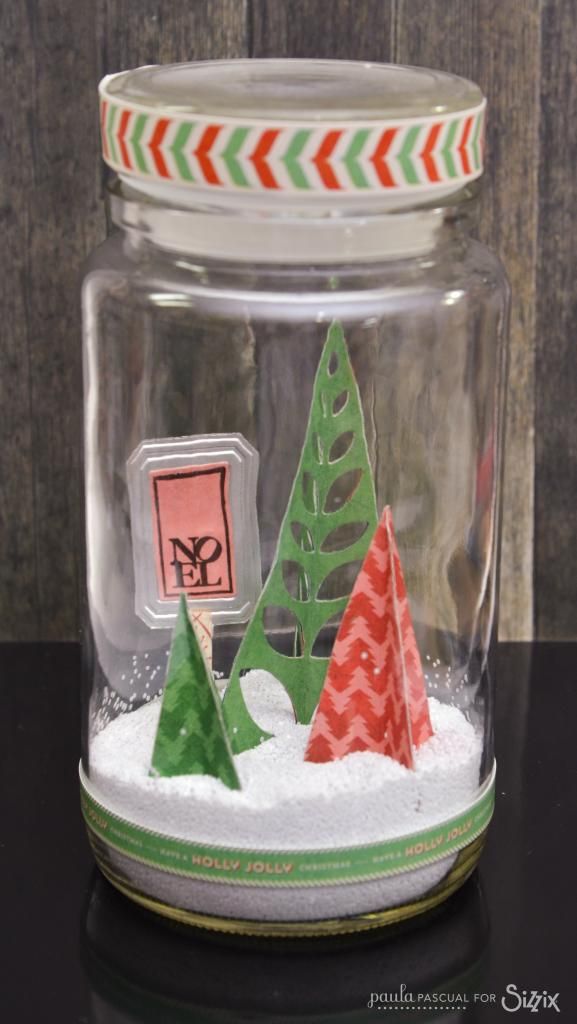
This is one of the cards I made during the demo. I rarely have time to make a card as I am busy demonstrating the new products and techniques. But I was quite pleased with this one. 


For this one above I used a s a base the Tag Framelit set, the Leafy Tree Framelit and Stamp set (to die cut the tree), the Leafy Tree Embossing folder set and the Snowflakes Framelits and Stamps set (to stamp and die cut the star at the top).


For the one on the left, I used as a base the Banner Framelit and Stamp set and the Snowflakes Framelits and Stamps set. The message is from the Winter Charms Framelits and Stamps set.

For the one on the right, I used as a base again the Tag Framelit set and then I used the Leafy Tree Framelit and Stamp set (to die cut the trees) and the Snowflakes Framelits and Stamps set (to stamp and die cut the snowflake at the center). The message is also from the Winter Charms Framelits and Stamps set.

One other great thing about demo days is that I get to see my craft buddies. And usually at the Glitter Pot, I get to see two of my oldest craft buddies as well as some of the newer ones.


I would say that Jane Gill is my oldest craft buddy. We go along exactly ten years, as we worked together at The Craft Barn (Surrey) for a few months. She is one of the most talented ladies out there as well as a lovely girl with a great sense of humour. We dont get to see each other much as we both have busy schedules, but it is always nice to see her.


Jackie Huckstepp is one of the newer craft buddies. She was demonstrating waxes and inky stuff using the Snowflakes embossing folders.


And this is the demo table of one of my closest crafts buddies, the one and only Julie Hickey. I often think that it would be good to clone her so that everyone could have a Julie Hickey in their lives. 

I am not going to say how talented she is, half of what I know about crafts, demo and teaching I owe it to her - the other half I owe it to Pete Hughes, but that is another story.


I wanted to show as well these two projects - a frame and a card - made by Alison Moore from The Glitter Pot using the Home die. I love seeing what others do with my dies.


And finally, I wanted to share this one card above that I made with acetate. I love the floating effect you get with acetate and I think it is perfect for all those floating snowflakes.

Today, I am a but tired but I am recharged creatively, there are many things I want to try inspired by fellow demonstrators and customers alike. Thank you!

Saturday 28 September 2013

Monthly blog post for Sizzix EU!


More Winter Moments, this time with a step by step tutorial over at Sizzix EU.
You can see the step by step here!

And remember today and Tomorrow I will demonstrating Winter Moments at The Glitter Pot, Burgess Hill, West Sussex.

-----

MĂ¡s Winter Moments, esta vez con un tutorial en el blog de Sizzix UE.

Friday 27 September 2013

Demo at The Glitter Pot

Tomorrow and Sunday (28th and 29th of September) I will be demonstrating my latest Sizzix die designs, Winter Moments, at The Glitter Pot, Burgess Hill, West Sussex.

If you are in the area, make sure to pop by as there will be many more demonstrators including my friends and super talents Julie Hickey and Jane Gill.

I can't wait!

Thursday 26 September 2013

Sizzix Winter Moments dies Layout!

Especialmente quiero dar gracias a todos los comentarios tan positivos en español, me hacen una ilusiĂ³n que no veĂ¡is!

I am so excited about the blog candy that is running on this blog (until the 7th of October 2013) I thought I would share some more Winter Moments projects this week.


It is a very simple layout that I did using the Winter Elements Decorative Strip. Sometimes, less is really more!

Also, I would like to share what Sizzix says about the collection:
Winter Moments - Europe Exclusive!
Have an ‘oh so chic’ Christmas this year! 
With the latest collection from designer Paula Pascual, you can create a winter wonderland in your home, or beautiful gifts and cards to send out to your lucky friends! The dies in the Winter Moments range are fresh and contemporary, but still retain the charm and versatility that is so often found with Paula’s designs for Sizzix.  Heart-warming phrases, cute Framelits with matching stamps and much more mean this collection is one you’ll use year after year – and not just for Christmas!
I hope you like it!

Monday 23 September 2013

My father's - Angel Pascual Rodrigo - studio

I have spoken in the past about my father, Angel Pascual Rodrigo. He is a proper professional artist. 

My father put both my sister and I through University - granted is much much cheaper in Spain than in the UK - with his art being his only income in the family, as my mum had one of  the most important and demanding jobs, mum and housewife. You have to be a very good artist to do that. 


My father's studio is near my parent's house in a very irregular piece of land. Because of the terrain, the studio has two levels. The entrance is the top mezzanine level. When I took the photos we were having a barbecue outside hence the Tupperware staff on the table.


My uncle Vicente Pascual Rodrigo was as well an artist. In fact they started painting together as La Hermandad Pictorica. They used to paint a lot of pop art in the seventies and my dad still has some one them on display.


My dad's style for the last few decades is more what I call minimalist landscapes with conceptual and historical references. He uses his many walls to store and display some of his favourite paintings.


 On one side there is a massive window that is two floors tall. As the lower floor of the studio is a semi basement, that window light is essential.


Bellow the stairs, you can find one of my father great crafty storage ideas. A way to store his working-on-paintings.


Those carts are old, very old. I remember them from my early childhood. I just love the look of those half empty half full oil tubes, the paint splatter utensils...


On the left, one of his amazing conceptions. A clever system to see who is approaching the car entrance. 


My dad still has loads of cassettes that he still listens too. As well as cd's. As he teaches painting classes every week, there are plenty of spare easels folded away during the week.


And that s a very important little storage area. On the left, you can see the paper and card storage, and it is important to me because is where I first found beautiful card and paper to use for my crafting which then led me to cardmaking all those years ago. I like the heavy duty and cutting tools on the right. Easy to reach, easy to store. Plus all his packaging stuff is hidden away there.


And, in case you were wondering, yes, my dad has a computer in there. Just a relic of the years past still in use, the up to day one is at my parents house.

I love this studio, it has happy memories from my early crafting days, clever storage ideas and beautiful art from my dad. What more can you ask for?

Related Posts Plugin for WordPress, Blogger...